|
This article is a follow-up to our article on Why You Should Write 'How To' Hobby Articles. Not long ago it was difficult, time-consuming, and (if you counted film and developing costs) relatively expensive to get good photographs to illustrate hobby "how-to" articles. When I started my first hobby web site, I was using what was then (1999) a $200 35mm camera. I could invest another $30 into film and developing for a large project, and only get a handful of useful shots, often NOT getting the shot that I really needed to illustrate some point. I know what you're thinking, I suck at photography. Well my family and travel photos were great, but zooming in to show details on hobby projects, often in compromised lighting, was trickier. So most of my articles were published with very few photographs.
Nowadays, you can get a $200 digital camera and spend another $30 on rechargeable batteries, a charger, and a 2-4-meg memory card, and get a virtually infinite number of shots to choose from, for that project, and the next, and the next. And the more you learn about digital camera photography, the higher the percentage of useful shots youll get.
This article will briefly describe ways to use digital photography to help you document your projects and lay the foundation for useful articles on any hobby topic.
Note: I start with the assumption that you don't want to pay more for a camera to document your hobby than you spend on your hobby in any given year, or that you don't want to spend more time learning to use the camera than you do working on your hobby. If you're already a shutterbug, or you have no problem dropping a grand on technology that is new to you, feel free to skim this article.
Go Digital
Every year it gets easier to buy a digital camera and a 2-gig or bigger memory card, learn how to use it, and keep it handy whenever you're working on a project. At any given time, there are usually a plethora of last-year's cameras on sale in the $100-150 range that will do the job. Here's a short list of things you can look for:
- At least 4 megapixels, unless you're planning on getting published in a printed magazine, then consider 8 or more.
- A lens that will provide at least 4X optical (not digital) zoom. (Even if you don't need a big zoom, a bigger lens lets in more light, which makes even "non-zoomed" photos better.)
- Optical image stabilization. This helps compensate for your hand dipping when you press the shutter, etc. Fortunately it's included in almost every over-$150 camera made today (Fuji was the lone holdout among "name brands," offering a 'blur-reducing' option that wasn't as effective, but they're starting to come around.)
- If the camera has any low-light settings, that's a plus, since flash-free photos are almost always better than flash photos. On my $100-200 Canons, the "Kids and Pets" settings combine a higher-than-average ISO with a faster shutter speed for reduced blur. Generally I take three photos of each thing I want to show and get one or two that have very crisp focus. On my 2004-2008 model Fujis, I can fix the ISO at 400 or 800 (for photos in relatively dark places). On the Fuji's, I don't get many photos that are good enough for National Geographic, but I get plenty that are good enough for the web. (Note: Most of the 2009 Fujis are better.)
- Try to find one that takes AA cells - most $100-200 digital cameras do, but it's not a given. If you wind up with a camera that takes a special battery, buy a replacement so you can always have a charged backup.
The list above is a minimum. If money is no object, you can go right to the high end. Any digital SLR with Image Stabilization will give you a much higher percentage of good shots, as will any high-end fixed-lens camera (such as the Canon SX10IS with Image Stabilization will give you a much higher percentage of good shots, as will any high-end fixed-lens camera (such as the Canon SX10IS or G10
 , or the Sony DSC H50 , or the Sony DSC H50 . .
On the other hand, maybe your family already owns a digital camera, and you're getting in trouble for leaving it in your workroom. Consider that owning two digital cameras is a lot cheaper than owning, say, two television sets. In our case, Fuji unexpectedly replaced a broken camera that was out of warranty, so we now own two fairly decent pocket cameras. Now I can disappear with one for days at a time without inconveniencing anyone else. Now, hard drive space, that's another issue . . . .
For more information about digital cameras, check out our article on using digital cameras to photograph garden railroads. That article explains the relative importance of many digital camera features.
Photograph Everything
Take photographs of everything. It is nice if you have an uncluttered workspace, or use a solid posterboard backdrop or something, but that's not as critical as showing every step.
Back in the days of 35mm cameras, I always felt silly taking photos of projects I wasn't sure would work out. If the project didn't work out (and many didn't), I had blown $5-15 worth of film and developing for "nuttin." The "flip side" if this was that, like many other hobbyists, if I decided that I wanted to document some project that had worked out, I had to do it all over again, taking photos the second time.
But today, I almost never start a project, even a very simple one, without a digital camera handy. Fortunately, any camera that works for this can also take good photos of the grandchildren or whatever, so you have an excuse for making this investment. Yes, after a few weeks or months, you may have hundreds of project photos in your "morgue" that you may never use. But, as any photojournalist knows, it's a hundred times easier to dig through your files and find a photograph you took "just in case" than it is to restage the original circumstances you are trying to write about.
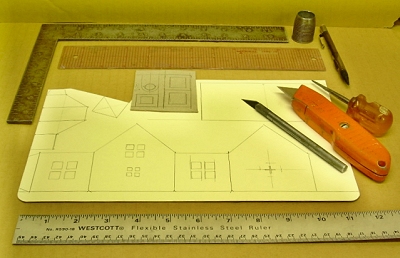
 Take photos of your materials and tools laid out before you begin - that will help you with your "materials and tools needed" lists later. Take photos of your materials and tools laid out before you begin - that will help you with your "materials and tools needed" lists later.
- Take photos of each stage. How do you decide what a "stage" is? Well, there are parts of any project when you set it down on the workbench and back up a little to decide if the last thing you did to it was successful.
Obviously, if you're using eleven different colors to paint something, you don't need to take a photo of each color being added. But you certainly need "before painting" and "after painting" photos. And if you're doing something special with the color, like drybrushing it on, consider a before-and-after shot of that process.
- Take photos of any process that is unusual or will require special description. You can probably assume that your readers know how to hammer a nail straight into a board or paint a birdhouse roof a solid color. But what if you're "toenailing" a screw into a complicated structure or using special techniques to provide "texture" to the birdhouse roof once its base coat is on? Here's an irony; as good as my contributors are about taking photos (after a certain amount of "headbeating" on my part in some cases), I still occasionally get an article submission with all of the "duh" stages of the project carefully photographed, and the tricky parts not photographed at all. I understand why that happens - the author's attention was on getting something to go on straight or whatever and he or she didn't have hands free for a photo. But the "tricky parts" are what make most articles special. Can I write "around" that omission? Of course. But the article would be more useful if I had photos of the tricky parts, too.
- Remember, this is ONE case where more is better. Most editors would rather have forty photos to choose from than to have to work around obvious gaps in the photographic record. And when you start writing your own articles, you'll agree, too.
- Take photos of the completed project, both on the workbench, and wherever it will eventually be used, whether it's an Afghan on the back of the couch, a flower arrangement on the mantle, or a train station on your model railroad. The context shots are what really "sell" project. "I could have one of those on my couch (or mantel, or railroad) just by following these instructions!" In addition, the context shots usually make the best "title photos" for your article.
- Finally, store the digital photos in a way that makes sense. Create a directory on your hard drive JUST for project photos. Create a subdirectory for each hobby or class of project, then create a subdirectory for each project. If you have to archive photos off onto CDs, clearly label each CD and store the CDs in an organized manner.
That way when you decide a month or year from now to document that project, you can go right to the photos you took instead of looking through thousands of thumbnails trying to track them down.
If you are an active hobbyist, it will be only a matter of a few months before you have many good photos for articles that you'll probably never have time to write. That's okay, you'd be surprised how often you can use those photos for other projects - or you may run into someone who wants to write an article about this sort of project but really sucks with a camera.
Tips for Getting Usable Photos
Here's some tips on how to get usable photos for an instructive article:
- Use room lighting if possible instead of flash. That may require turning on every light in the room, bringing in an extra lamp or two, photographing mostly in daytime near a window, or even taking your project outside. It also may requiring being careful to stand where there is no direct glare on the object you're photographing, and where you don't cast a shadow on the subject area.
- For photographs of individual items, use a solid background whose color won't blend into the object you are trying to photograph. A couple of years ago, my friend and frequent article contributor Howard Lamey bought a couple pieces of blue posterboard that he sticks behind most things he is photographing. Posterboards can be had for .50 to $1, but they will save you or your editor many headaches if you decide to use the photograph.
- On many under-$200 cameras, the "macro" (close-up) setting doesn't focus as well as if you stand a couple feet back and zoom in with whatever low-light setting you've found helpful. Note: The macro setting often is useful when you have to squeeze into a tight place, or when you need a "bug's-eye-view" of something (complete with the distorted perspective that comes from being very close to the subject). So please feel free to experiment. Just don't assume that it's the best choice for all "close-ups."
- In really dark settings, use a tripod, if possible. Otherwise, find something to brace the camera on or against to help it hold steady.
- Use the camera's maximum advertised resolution. If you have a choice between "normal" (N) and "fine"
(F) compression, "normal" is just as good as "fine" for web photography. If you're going for a magazine, choose "fine." Just remember to take the camera off of "fine" for family photos - or you'll use up your hard drive (and maybe your patience) in a hurry.
- Take lots and lots and lots of photos, including taking two of every thing you would ordinarily take one of - it doesn't cost anything to pull up five photos on the computer, decide which one to keep and which four to delete.
- If you're photographing a critical step, use your camera's lcd screen playback and zoom features to make certain you have at least ONE photo that shows good detail before you go on to the next step.
- If you have time and space to set up a tripod, that will increase your percentage of useful shots.
- Copy the photos to your computer without using a paint program or something that actually opens and resaves the file. You can look at files with "Preview" or "Slide Show" software all you want, but if you open it with Paintbrush or Paint Shop or the like and save it, the software will "recompress" the file and you'll lose a little detail every time.
- If you want to edit your own photos, rename the photo you save, so you don't write over your original.
- Create a "folder"(directory) on your hard drive for each project and put just that project's photos there. Delete everything that is too blurry to use or redundant with a better photo, but leave the potentially useful originals alone in case you need to come back to them later or you actually sell the article to a magazine.
Note: Video is not a replacement for photography - sometimes folks send me little videos of them doing some task and tell me I can host the video or post it as an article if I want. But I don't have the bandwidth to host video streams, and the videos seldom show enough detail about the project to be all that helpful. Simple lists of materials and steps, accompanied by clear still photos are usually much more helpful to most people.
That said, occasionally a video is a good "stop-gap" if you have stumbled on to something fantastic and want to communicate it as fast as possible. And a few hobby sites do host videos that they consider useful.
Howard Lamey's Miniature Studio
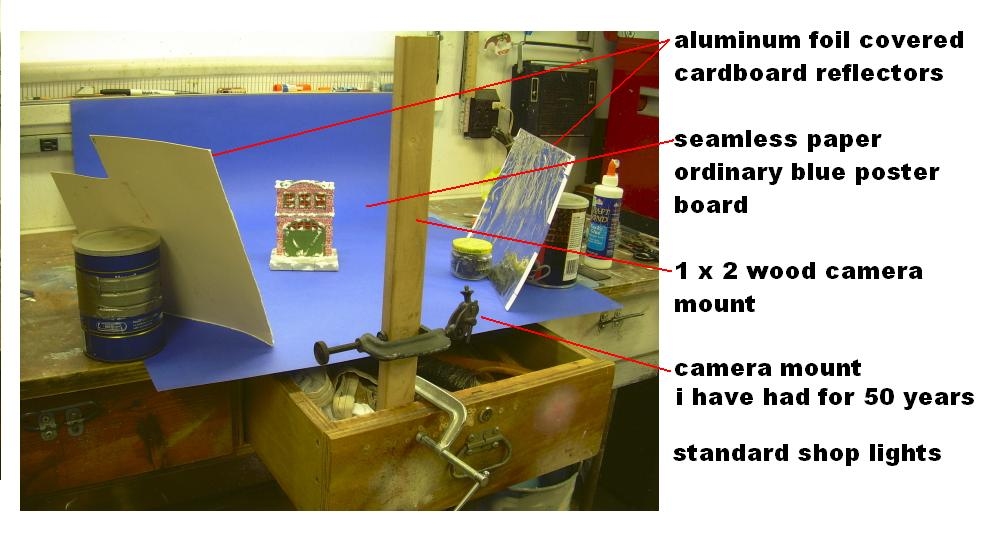
Howard Lamey was recently corresponding with other hobbyists who take photos of miniatures, when he took the photo below to illustrate how he gets good lighting.
You'll see
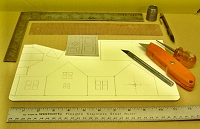
 that Howard uses foil-covered panels to reflect light to both sides of the object being photographed. This usually brings out the colors and details of areas that might otherwise have been in the "shade," and reduces harsh shadows. In more elaborate (read "store-bought") setups, folks add lamps, but provide a translucent (usually nylon or silk) "diffuser" to soften the shadows. But this photo shows how simple it is to obtain professional results with a digital camera, an antique camera mount, and a few scraps of wood and cardboard. I included the photo to the right to show how Howard's closeups usually turn out - very professional-looking. that Howard uses foil-covered panels to reflect light to both sides of the object being photographed. This usually brings out the colors and details of areas that might otherwise have been in the "shade," and reduces harsh shadows. In more elaborate (read "store-bought") setups, folks add lamps, but provide a translucent (usually nylon or silk) "diffuser" to soften the shadows. But this photo shows how simple it is to obtain professional results with a digital camera, an antique camera mount, and a few scraps of wood and cardboard. I included the photo to the right to show how Howard's closeups usually turn out - very professional-looking.
Carl Arendt's Tips
Howard recently forwarded me these additional tips from Carl Arendt, who has specialized in miniature railroads (and miniature photography) for years. In Carls words:
- For those who haven't already built a "photo studio" like the one you use, Micro-Mark
offers a complete setup for a discount price (around $80). [Sample miniature photo studios are shown in the Amazon links below - Ed]
- The page on lighting and photography in my Small Layout Scrapbook
archive is http://carendt.us/scrapbook/page60/ The most important suggestion there concerns light sources -- use Daylight Fluorescents to get crisp, vibrant colors (as if
they were illuminated by sunlight), and add inexpensive halogen spotlights to give a
warm, 3-D glow to selected highlight areas. The combination is unbeatable! I use a
desktop Ott-Lite (shown in the page referenced) along with a lower-level halogen spot as
a fill light (to show details that are shadowed by the "sunlight" from the Ott). The
result is usually striking.
- To underline: ALWAYS use a tripod (or other stable camera mount) especially on closeup
shots like the ones you're taking! And if possible, adjust the final focus yourself (if
your camera permits).
- You might want to try a black panel at one side of your booth, replacing one of your
silver panels. Put the primary light source above the booth at the opposite side, and you
will get some wonderful shadows and shading. This is a great way to show off textures in
building surfaces, for example! I use it when I want to emphasize the details in a model,
rather than its over-all appearance in a landscaped scene. It's also a good way to
produce a dramatic shadowing effect (requires some fiddling but is well worth it!).
Looks like you're well launched! Keep up the good work! - Carl
Miniature Studios
Keep in mind that if you were to photograph me in my "studio," it would look a lot like me turning on every light in the kitchen, finding a place to stand where neither glare nor my shadow interferes with the subjects and taking several shots of each step to make certain I have it covered. Or maybe even taking the whole thing outside to photograph, preferably on a bright, but cloudy day.
That said, if you have miniatures of any kind you want to photograph, the following "studio in a box" examples should give you a good idea of the kind of things Carl and I have written about above. Such as a solid-colored backdrop and side-lighting with small halogen lights, diffused by a silky fabric or translucent film.
Conclusion
Photography is a hobby in itself, but learning to use a digital camera effectively for a wide range of situations is relatively easy. In addition, "entry-level" digital cameras have more features every year, so the percentage of good shots keeps going up, even in the hands of beginners. For most people, a picture IS worth, well, 500 words, so start thinking visually as well as verbally. In fact, I hope to add more photographs illustrating the points in this article eventually, but I had to start somewhere.
Please let me know if you have any questions or corrections.
Paul Race
Breakthrough Communications
For more information about writing about your hobby, please check out the following articles:
P.S. Enjoy your hobby. And especially enjoy any time you have with your family in the coming weeks.
|
|

 that Howard uses foil-covered panels to reflect light to both sides of the object being photographed. This usually brings out the colors and details of areas that might otherwise have been in the "shade," and reduces harsh shadows. In more elaborate (read "store-bought") setups, folks add lamps, but provide a translucent (usually nylon or silk) "diffuser" to soften the shadows. But this photo shows how simple it is to obtain professional results with a digital camera, an antique camera mount, and a few scraps of wood and cardboard. I included the photo to the right to show how Howard's closeups usually turn out - very professional-looking.